To save a life in an emergency, one must act quickly. You can do this by conducting quick first aid while waiting for a professional medic to get to the scene.
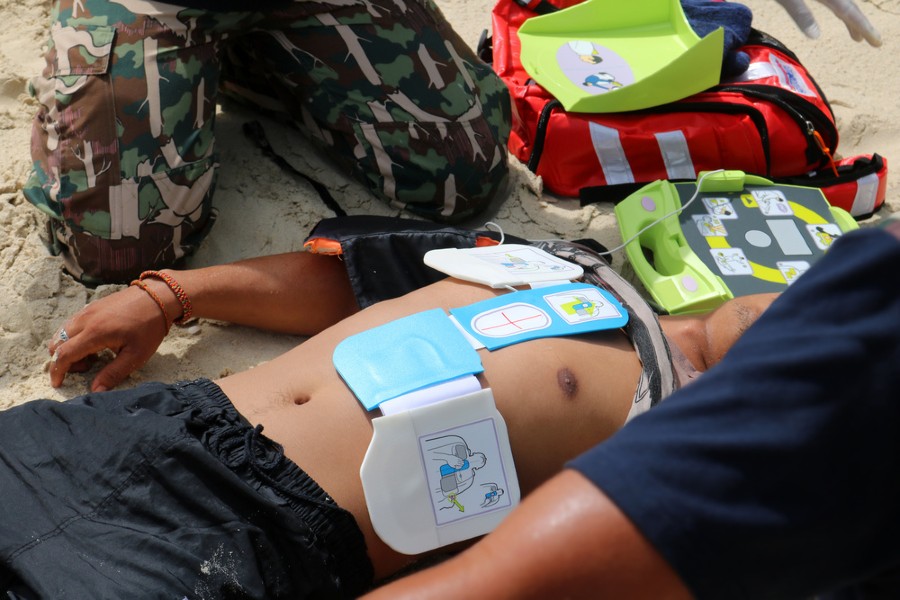
A chest seal is one essential item you shouldn’t miss in your kit. It can significantly help someone who’s shot or stabbed by a knife.
Immediate attention is required for the wounded victim, especially if they have trouble breathing. Also, if timely care isn’t provided, serious damage could occur to vital organs such as the lung, heart, or blood vessels.
A chest seal would be useful in this scenario to help the victim. Although it’s not used to stop bleeding, it prevents air from being sucked into the wound or chest cavity. Notably, a chest seal with the necessary flow valves facilitates airflow from the chest cavity at low resistance while blocking ingress and preventing further internal blockage.
With that in mind, here are six tips for using chest seals in emergencies:
- Read The Seal Instructions
If you’re using the chest seal for the first time, it’ll help to read the manufacturer’s instructions to know how to apply it correctly. Chest seals come in numerous shapes and sizes, and the procedures vary slightly from one brand or model to the other. So, try not to generalize chest seals and avoid applying your knowledge about one to all others.
Being thorough with the instructions helps avoid mishaps when handling a victim with a chest wound. Failure to seal the wound properly may allow air in—manifesting as blood bubbling on the injury. Excessive air accumulation may result in pneumothorax, which leads to a collapsed lung.
- Dry The Wound Area
Upon spotting a wounded victim, the first thing is to clean the wound area using a gauze pad or a sterile cloth. This procedure is done to identify the exact wound location. With deep wounds, there’s usually the case of bleeding or sweating profusely, and it’s difficult to ascertain the precise area that’s been hit. Once you clean it, you’ll see the exact entry hole of the bullet or the knife mark if it’s a stab wound.
- Cover Every Open Wound
Once the wound is dry, cover all the open wound areas with the chest seal. You can apply this by slowly removing the plastic support on the seal while rolling the sticky side on the wound. Removing the plastic backing on the seal several minutes before using it isn’t a good practice because it can accumulate germs and debris and possibly infect the victim.
For a gunshot victim, there’s also the possibility that the bullet went through one side and emerged on the other end. Hence, you need to check for the exit wound. You must turn them on the side and check if there’s an exit wound.
Assess the wound thoroughly because the exit wound may not be as pronounced as the entry one. Once you successfully locate it, apply another chest seal to avoid the possibility of air getting through this wound.
- Ensure The Seal Sticks Firmly
You must confirm that the chest seal is properly stuck over the wound and no air is passing through the seal whenever the victim inhales. It’s the only way you’ll be sure the seal is working. You can check this by listening for any sounds passing through while the victim is breathing. Do this repeatedly on any other wounds you’ve sealed up.
- Understand The Different Types Of Chest Seals
Different chest seals serve unique functions, such as vented, unvented, or improvised. Here’s how to use them:
- Unvented Seals
First, cover the wound with a gauze pad. Then, ask the victim to cough or wait for them to exhale so you can apply it. It helps minimize the air trapped in the chest before using the seals. If you notice they’re having difficulty breathing, cover the seal when the victim inhales and uncover it when they exhale.
- Vented Seals
Unlike unvented seals, you won’t have to wait for the victim to exhale or cough before applying vented seals. These seals constantly let out trapped air or blood from a wound.
- Improvised Seals
If you find yourself in a situation where you don’t have access to a chest seal in your first aid kit, you can improvise one and use it to save someone’s life. You’ll need a sterile dressing because it has plastic and paper sides and tape. When using it, wrap the tape around the patient’s body to ensure it sticks.
- Monitor The Victim’s Breathing
Once you’re done sealing the wound, you can stay with the victim to monitor their breathing while waiting for a healthcare professional to get to your location. If the seal isn’t working as intended, you can replace it with another one immediately.

Conclusion
Emergencies are unplanned, yet you must act quickly to save a life. Thus, begin by ensuring your first aid kit has enough chest seals. Also, go through the necessary training on applying chest seals.
Become a Harlem Insider!
By submitting this form, you are consenting to receive marketing emails from: Harlem World Magazine, 2521 1/2 west 42nd street, Los Angeles, CA, 90008, https://www.harlemworldmagazine.com. You can revoke your consent to receive emails at any time by using the SafeUnsubscribe® link, found at the bottom of every email. Emails are serviced by Constant Contact